The RGB Modification Tool

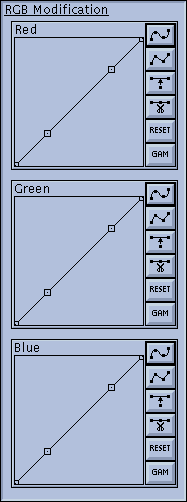
The RGB Modification tool is a collection of three graph windows, each of which operate on one of the components of the RGB colorspace. This tool lets you perform global color-correction on the image by boosting or cutting the values of one or more of the RGB color components. You can use this to correct for color screens that are 'too blue', or for color printers that produce 'brownish' output, or whatever.

The graphs work exactly as explained in "The Intensity Graph" .

Neat Trick: In addition to color-correction, you can use the RGB modification tool to add color to images that didn't have color to begin with. For instance, you can 'pseudo-color' a greyscale image.

An example of pseudo-coloring:

  1. Adjust the Red graph so that there is a strong red presence on the right side of the graph, and none on the left, or in the middle.
  2. Adjust the Green graph so that there is a strong green presence in the middle of the graph, and none on the left or right.
  3. Adjust the Blue graph so that there is a strong blue presence on the left side of the graph, and none on the left, or in the middle.
  4. The graphs should look roughly like this:

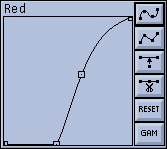
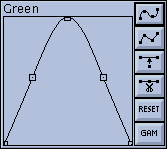
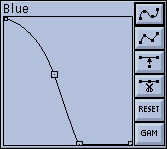
You now have a transformation that will take greyscale images and display them in pseudo-color, using a 'temperature' color scheme. Neato!

The Color Editor Controls

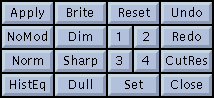
These buttons provide general control over the whole xv color editor window. You can display the image with or without color modification, save and recall presets, and undo/redo changes. Also, convenience controls are given for performing some of the most common operations on the Intensity graph.
Displays the image using the current HSV and RGB Modifications. Also turns the 'Display with HSV/RGB mods' checkbox on. (See below.) This is only useful when the 'Auto-apply HSV/RGB mods' checkbox is off.
Keyboard Equivalent: <Meta> a
 
Displays the image without any HSV or RGB Modifications. Also turns the 'Display with HSV/RGB mods' checkbox off.
 
Undoes the last change to the HSV or RGB controls.

It may be helpful to think of xv as maintaining a series of 32 'snapshots' of the HSV and RGB controls. You are normally looking at the last frame in this series. The Undo control moves you backwards in the series.

Only available after you've hit Undo . Moves you forward in the 'snapshot' series described above. Note that if you have hit Undo a few times (i.e., you're now looking at some frame in the middle of the series), and you change an HSV or RGB control, all subsequent frames in the series are thrown away, and the current state becomes that last frame in the series.
 
Resets all HSV and RGB controls to their default settings. Doesn't affect the Colormap Editing tool. Note that these default settings can be changed using the Set command described below.
Keyboard Equivalents: R , <Meta> r , and <Meta> 0
 
Pressing any of these buttons recalls a preset (a complete set of values for the HSV and RGB controls). By default, the presets are:
  1. Binary intensity. Every color in the image is either at full brightness, or black. Gives images a neat 'neon' sort of look, much like the Saturday Night Live credits of the late-70's.
  2. Binary colors. The image will be shown using only the 8 binary combinations of red, green, and blue. (e.g. black, blue, green, cyan, red, magenta, yellow, white)
  3. Temperature pseudo-color. (For use on greyscale images) Maps intensity values 0-255 into a 'temperature' color scheme where blue is 'coldest' and red is 'hottest'.
  4. Map pseudo-color. (For use on greyscale images) Maps intensity values 0- 255 into something akin to the standard 'elevation map' color scheme (blue, green, yellow, brown)

Of course, you can replace these defaults with your own. See "Modifying xv Behavior" for more details.
Keyboard Equivalents: <Meta> 1 , <Meta> 2 , <Meta> 3 , and <Meta> 4

Used in conjunction with the Reset, 1, 2, 3, or 4 buttons to store the current settings of the HSV and RGB controls into a preset. To do so, press the Set button, and then press one of the Reset, 1, 2, 3, or 4 buttons. The current HSV and RGB control settings will be stored in that preset, as long as xv continues running. The values will be lost when the program exits. It is also possible to save these values permanently. See the CutRes button (below) and "Modifying xv Behavior" for more details.
 
Copies the current settings of the HSV and RGB controls, as text, into the X server's cut buffer. You can then use a text editor to paste these values into your '.Xdefaults' (or '.Xresources') file. This lets you save the current settings 'permanently'. See "Modifying xv Behavior" for more details.
 
This button closes the xv color editor window.
 
Brightens the image by moving all the handles in the Intensity graph up by a constant amount.
 
Darkens the image by moving all the handles in the Intensity graph down by a constant amount.
 
Increases the contrast of the image by moving handles on the left side of the Intensity graph down, and handles on the right side up.
 
Decreases the contrast of the image by moving handles on the left side of the Intensity graph up, and handles on the right side down.
 
Normalizes the image so that the darkest pixels in the image are given an intensity of '0', and the brightest pixels are given an intensity of '255'. Intermediate colors are interpolated accordingly. This forces the image to have the full (maximum) dynamic range.
Keyboard Equivalent: N
 
Runs a histogram equalization algorithm on the currently displayed region of the image. That is, if you're cropped, it will only run the algorithm on the cropped section. Note, however, that the only modification it makes to the image is to generate a bizarre corrective Intensity curve. As such, if you HistEq a section of the image, the rest of the image will probably not be what you'd want. Also note that the histogram curve will 'go away' if you touch any of the handles in the Intensity graph window, just like a 'gamma' curve would.
Keyboard Equivalent: H
 
The 'Display with HSV/RGB mods' checkbox tells you whether or you're looking at a modified image (checked) or the 'raw', unmodified image (unchecked). The Apply and NoMod buttons change the setting of this checkbox, and you can also change the checkbox directly by clicking on it.
 
The 'Auto-apply HSV/RGB mods' checkbox controls whether or not the program regenerates and redisplays the image after each change to an HSV or RGB control. By default, this checkbox is turned on, so that you can easily see the results of your modifications. However, if you want to make a large number of changes at once, it might be preferable to turn automatic redisplay off for a while, to speed things up.
 
The 'Auto-apply while dragging' checkbox controls whether or not the image colors are changed automatically as you manipulate the various xv color editor dials and graphs. This button is normally turned on, but for it to have any effect, you must be in 'Read/Write Colors' mode. See "Color Allocation Commands" and the '-rw' mode described in "Color Allocation Options" for more information.
 
The 'Auto-reset on new image' checkbox controls whether or not the HSV and RGB controls are Reset back to their default values whenever a new image is loaded up. By default, this is also turned on, as when you're playing with the HSV/RGB controls, you probably only want to affect the current image, and not all subsequently loaded images as well.