Because Bezier paths are so useful, there is a special Paths dialog
that allows multiple Bezier paths to be edited, managed, and saved.
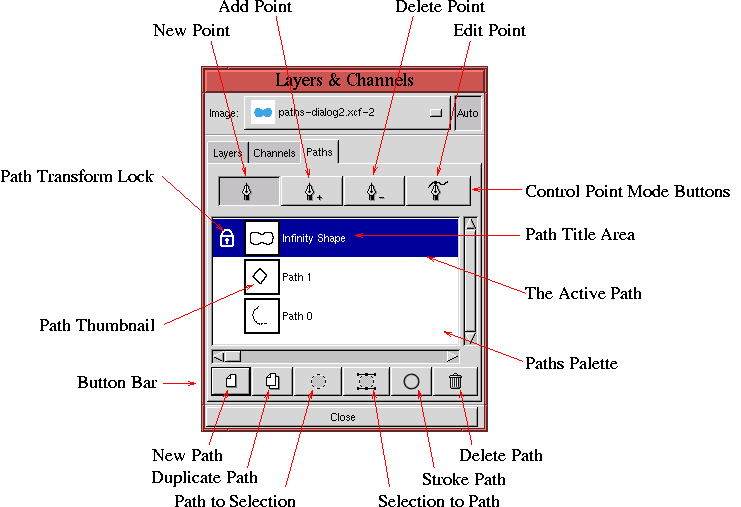
The Paths dialog, shown in Figure 3.21,
The most important part of the Paths dialog is the Paths Palette. The palette contains horizontal strips, where each strip represents a single path for the image. Each strip contains a Path Thumbnail, a Path Title, and a Path Transform Lock.
Figure 3.21 illustrates a Paths Palette
containing three strips. The top strip is highlighted in blue,
indicating that it represents the active path. Only the active path
can be seen and manipulated in the image window. Clicking on a path
strip in the Paths Palette makes that path active and also makes it
visible in the image window.
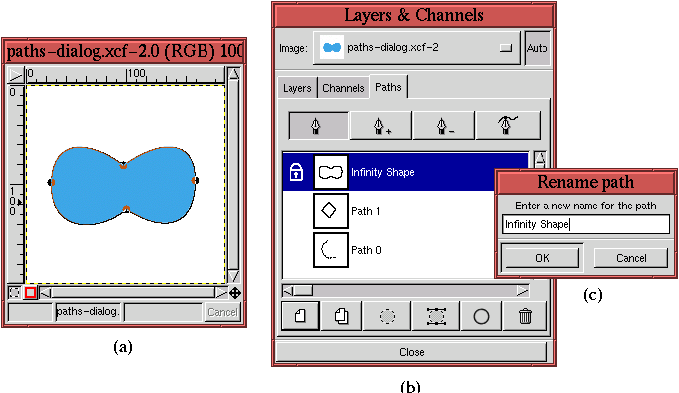
Figure 3.22(a)
A path's title can be changed by double-clicking in the title area. This brings up a dialog where the text of the new title can be entered. Figure 3.22(c) illustrates the dialog for changing the Path Title.
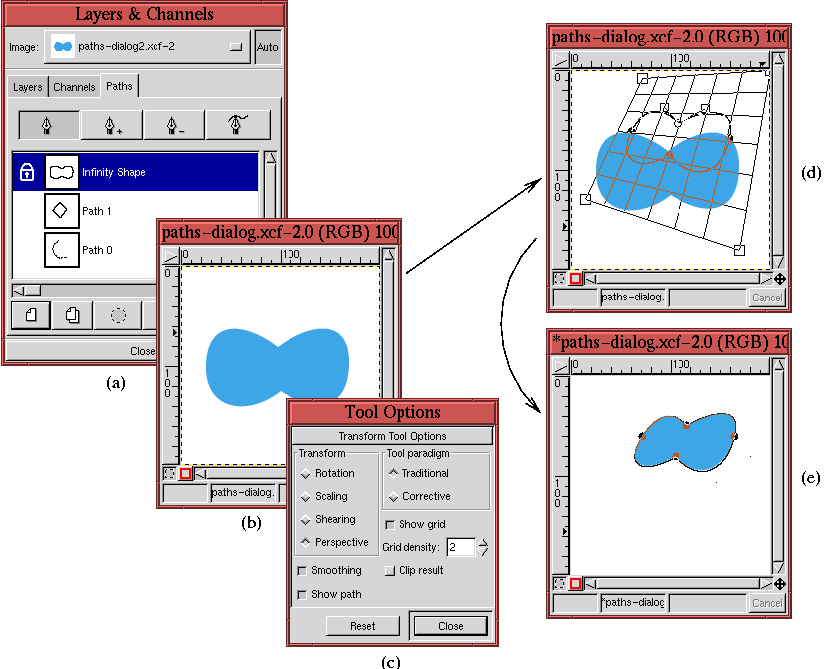
Finally, the Path Transform Lock can be toggled on and off by clicking to the left of the Path Thumbnail. When the icon is toggled on, the path's shape is locked to the active layer with respect to the Transform tool. This means that any transform applied to the active layer is also applied to the path.
Figure 3.23
Figure 3.23(c) shows the dialog for the Transform tool. The Perspective radio button has been selected, and the Show path checkbox has been toggled on. This last button makes the active path visible in the image window while it is being transformed. Figure 3.23(d) shows the perspective transform of the grid and the active path. When the transform is actually performed by clicking on the Transform button in the Perspective Transform dialog, the result is as shown in Figure 3.23(e). The active layer containing the shape is transformed and the path associated with this shape is transformed along with it.
The ability to see a path superimposed on the transform grid while performing a transformation of a layer is a particularly useful capability. There is no more precise way of warping one image to another than with this feature. A concrete example of using the Path Transform Lock is illustrated in Section 7.2.
The Control Point Mode Buttons are shown in Figure 3.21. These consist of the New Point, Add Point , Delete Point , and Edit Point buttons. These control the behavior, or mode, of mouse clicks in the image window when you're using the Bezier Path tool.
When using the Bezier Path tool with the New Point mode button selected in the Paths dialog, there are two behaviors for a mouse click in the image window. The first behavior is associated to working on an open path. In this case, clicking in the image window creates a new control point that is immediately connected to the last control point on the path by a path segment. The last new control point on an open path is displayed as a circle outline. All the other points on the path are displayed as solid circles.
The second behavior of the New Point mode button is when there is no open path. Then, a mouse click in the image window initializes a new path.
When the Bezier path is in New Point mode, the mouse cursor appears in the image window as an arrow with a filled circle below it. This indicates that the next mouse click will create a new control point.
The Add Point mode button is for adding a point to a path segment between two existing control points. This is useful when a path has been created but doesn't have a sufficient number of points to properly follow the desired shape. When the Add Point mode button is active, the mouse cursor changes to an arrow with a plus symbol below it whenever the cursor is close enough to a path segment to add a point. If the mouse button is not released when the point is added, the point can immediately be edited. In other words, if the mouse button remains pressed the control handles will appear when you drag the mouse, and the Shift and Control keys can be used to manipulate the control point and the control handles. This is a handy feature because a control point can be added to a path and then immediately edited without having to return to the Paths menu.
The Delete Point mode button removes control points from a Bezier path. This can be used to delete extraneous control points or those that were added accidentally. When you use the Delete Point mode button, the mouse cursor changes to an arrow with a minus symbol below it whenever the cursor is close enough to a control point to delete it. If the Shift key is pressed while using the Delete Point mode button, the mouse click deletes the entire path.
Finally, the Edit Point mode button allows the control handles to be manipulated and the control points to be moved, as described in Section 3.1.1. That is, clicking and dragging on a control point moves the point's control handles in unison. Shift-clicking and dragging a control handle moves that handle independently of the other one. Control-clicking and dragging the mouse on a control point makes the control point move, following the mouse. Finally, Alt-clicking and dragging the mouse on a control point causes the entire path to follow the mouse. When you're using the Edit Point mode button, the mouse cursor changes to an arrow with the outline of a square below it whenever the mouse cursor is close enough to a control point to edit it.
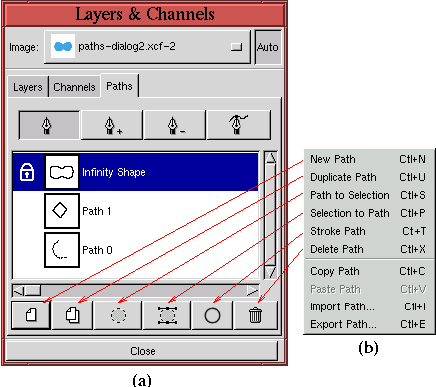
Like the Layers dialog and the Channels dialog, the Paths dialog also
has a menu that can be displayed by right-clicking anywhere in the
Paths Palette area. Figure 3.24(a)
The Copy Path function copies the path in the active path strip to a buffer. This path can then be pasted into another path strip, either in the same image or in another, using the Paste Path function. The Export Path function brings up a dialog allowing the active path to be saved to disk. This saved path can later be recovered using the Import Path function .
Because the remaining functions are available in the button bar, they are described in the next section.
The Paths dialog button bar provides access to six functions: New Path, Duplicate Path, Path to Selection, Selection to Path, Stroke Path, and Delete Path.
New Path and Duplicate Path are self-evident. The New Path button creates a new path, and the Duplicate Path button duplicates the current active path.
The Path to Selection button converts the active path to a selection. The path can also be converted to a selection by simply clicking inside the path in the image window. In either case, this causes the selection's Marching Ants to appear in the image window but does not necessarily cause the visibility of the path to toggle off. To toggle off the path's visibility, click on a tool icon, other than the one for Bezier Path, in the Toolbox.
The Selection to Path button is the same as the To Path function described in Section 3.3.12. Using this button converts a selection visible in the image window to a new path in the Paths dialog. This becomes the active path and can be seen in the image window.
The Stroke Path button is the same as the Stroke function described in Section 3.3.15. It is applied to the active path using the active brush and the active foreground color. In addition, the Stroke function in the Paths dialog will stroke the path using any painting tool selected from the Toolbox. To specify the painting tool, you select its icon in the Toolbox just prior to clicking the Stroke Path button in the Paths dialog. Using this technique the Airbrush tool can be used, for example, to stroke the path.
Finally, the Delete Path button removes the active path from the Paths Palette.